CRUD增删改查
项目中的表格模块(如文章表格管理)都需要使用到CRUD的增删改查操作
我们可以使用命令创建一个模块的所有资源:nest g res article --no-spec
使用该命令可以一次性的将模块、控制器、服务、
dto文件夹等等都创建如果后续要使用到增删改查的话,可以选择
REST API,提供了增删改查的功能代码(在控制器中)可以将不使用的
entities文件夹进行删除
REST API
常用的REST API有以下几个方法(前后端分离的话有五个方法):
- (
GET请求)获取文章列表:article - (
GET请求)查找某一篇具体的文章:article/{id} - (
POST请求)增加一篇文章:article - (
PUT请求)更新一篇文章:article - (
DELETE请求)删除一篇文章:article
添加
添加一篇文章时,一般需要加上验证规则,dto/create-article.dto.ts:
import { IsNotEmpty } from "class-validator";

export class CreateArticleDto {
    @IsNotEmpty({ message: '标题不能为空' })
    title: string;
    @IsNotEmpty({ message: '内容不能为空' })
    content: string;
}添加文章的服务函数,在article.service.ts文件中编写:
// 创建一条文章数据
create(createArticleDto: CreateArticleDto) {
    return this.prisma.article.create({
      data: {
        title: createArticleDto.title,
        content: createArticleDto.content,
      }
    });
}
删除
删除文章的服务函数,在article.service.ts文件中编写:
// 通过id删除文章
remove(id: number) {
    return this.prisma.article.delete({
      where: { id }
    });
}
修改
修改对应id的具体文章的服务函数,在article.service.ts文件中编写:
// 通过id更新文章
update(id: number, updateArticleDto: UpdateArticleDto) {
    return this.prisma.article.update({
      where: { id },
      data: {
        title: updateArticleDto.title,
        content: updateArticleDto.content,
      }
    });
}
查询
查询和分页限制
如果我们查询所有的文章数据,一般我们需要对其进行分页设置,我们可以将每页多少条数据写在配置项文件.env中,使用的时候去读取它:
# 每页文章数量(多少条文章数据)
ARTICLE_ROW = 5分页查询服务的具体函数,在article.service.ts文件中编写:
// 分页查询文章数据
async findAll(page = 1) {
    const row = this.config.get('ARTICLE_ROW');
    // 查询到所有文章,并设置分页
    const articles = await this.prisma.article.findMany({
      skip: (page - 1) * row,
      take: Number(row),
    });

    const total = await this.prisma.article.count();

    return {
      meta: {
        current_page: page,  // 当前页
        page_row: Number(row),     // 每页显示多少条
        total,  // 统计文章总数
        total_page: Math.ceil(total / row),  // 总页数
      },
      data: articles,   // 返回文章数据
    };
}通过id进行查询
通过id进行查询具体的文章的服务函数,在article.service.ts文件中编写:
// 通过id查询具体的文章
findOne(id: number) {
    return this.prisma.article.findFirst({
      where: { id }
    });
}
精确的查询出对应
id的具体文章
apifox全局脚本
增删改查中的有些操作需要传入具体的id才能进行,通常有两种方式进行:前置操作和后置操作:
后置操作:在添加具体的文章后,我们将这个
article_id保存到环境变量中,和用户注册保存token一致前置操作:编写一个自定义/公共脚本:
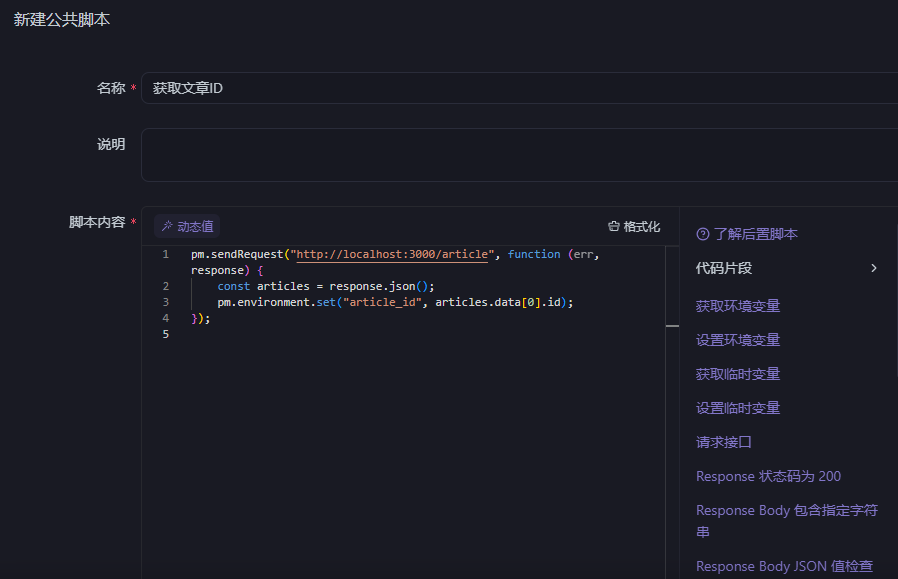
在前置操作中加载这个公共脚本,前置操作是执行这个接口请求时执行的动作,也就是执行当前接口操作前先取一下这个文章的
id
api请求前缀
如果有一个域名,为了区分后端的接口和前端的接口,一般情况下需要进行区分,后端的接口实际调用需要在端口后面添加一个前缀,如/api,在入口文件main.ts中进行声明:
import { NestFactory } from '@nestjs/core';
import { AppModule } from './app.module';
import { Validate } from './common/vaildate';
import { TransformInterceptor } from './transform.inteceptor';
import { NestExpressApplication } from '@nestjs/platform-express';

async function bootstrap() {
  const app = await NestFactory.create<NestExpressApplication>(AppModule);
  // 绑定注册的验证管道
  app.useGlobalPipes(new Validate());
  // 声明拦截器
  app.useGlobalInterceptors(new TransformInterceptor());
  // 设置接口前缀
  app.setGlobalPrefix('api');
  await app.listen(process.env.PORT ?? 3000);
}
bootstrap();在apifox接口工具的测试环境改为:http://localhost:3000/api即可